This is default featured slide 1 title

Go to Blogger edit html and find these sentences.Now replace these sentences with your own descriptions.

This is default featured slide 2 title

Go to Blogger edit html and find these sentences.Now replace these sentences with your own descriptions.

This is default featured slide 3 title

Go to Blogger edit html and find these sentences.Now replace these sentences with your own descriptions.

This is default featured slide 4 title

Go to Blogger edit html and find these sentences.Now replace these sentences with your own descriptions.

This is default featured slide 5 title

Go to Blogger edit html and find these sentences.Now replace these sentences with your own descriptions.

Showing posts with label photoshop CS 5. Show all posts

Create Fisheye Effect With Photoshop CS 5 method 3(Use Liquify tools)

If you already read method 1 and method 2, you know that Photoshop CS 5 on of digital image editor have many method to create fisheye effect. And now we'll learn create it using Liquify tools. With all these 3 method tutorial, you can choose which tutorial you like.
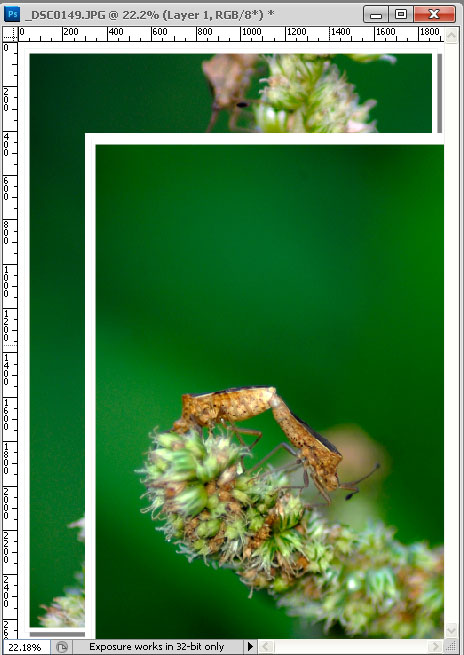
1. Open your file
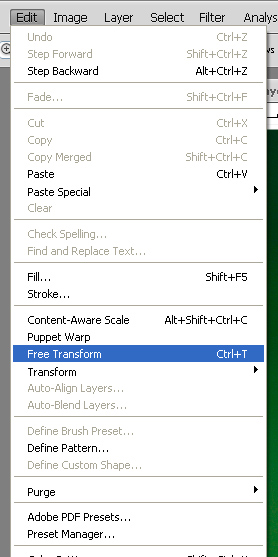
2. Left click Filter and choose Liquify
Filter > Liquify
3. New window will appear. At left choose Bloat Tool(B)
Bloat Tool(B)
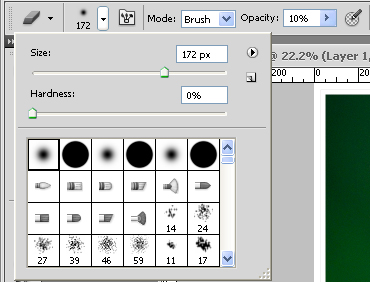
4. At the right at Tool Options set Brush Size, Brush Density and Brush Rate as you like. We use Brush Size = 436, Brush Density = 60, and Brush Rate = 66. And then click our photo. Some times not only 1 click but it can 4-5 click as you like.
Tool Options
5. And then you can save it
fisheye effect using Liquify

Create Fisheye Effect With Photoshop CS 5 method 2(Use Distort tools)

From method 1, we already know how to create fisheye effect use Lens Correction. Because Photoshop CS 5 as a digital image editor have many tools, we can create fisheye effect with another tools. In these method 2 we'll learn create it using Distort.
1. Open your file
2. Left Click Filter, choose Distort, and left click Pinch
Filter > Distort > Pinch
3. New window will appear. Set Amount at -60%
Pinch
4. Click OK at the top right corner. And your photo ready to save.
create fisheye effect using Distort (Pinch tool)

Create Fisheye Effect With Photoshop CS 5 method 1(Use Lens Correction)

If you have an offline digital image editor, it's very useful to make your digital image/photo to look more attractive. And if you compare another offline digital image editor and online digital image editor, Photoshop CS 5 is one of the best offline digital image editor.

You already now what is it fisheye effect, right? And already know hot to create it with GIMP or Photoscape. Now we will create it with Photoshop CS 5 using Lens Correction tools.
1. Open your file in Photoshop CS 5
2. Left Click Filter and choose Lens Correction
Filter > Lens Correction
3. New window will appear. Choose Custom at the right. Set Remove Distortion at -40.00
Remove Distortion
4. And then click OK at the top right corner.
before use Lens Correction

after use Lens Correction

Reduce Noise With Photoshop CS 5

Noise have some sense at photography or digital image editing. Some times it's make unique photo. But some time it's very annoying. If you have Photoshop CS 5 you can reduce noise your photo.
1. Open your photo
2. Left Click Filter on the top menu and choose Noise > Reduce Noise.
Filter > Noise > Reduce Noise
3. New window will appear. Set Basic or Advance as you like. And Set Strength, Preserve Details, Reduce Color Noise, and Sharpen Detail.
Reduce Noise
4. And then you can save your photo
Before
After

How to Crop Photo with Photoshop CS 5

If your photo have some element that you want erase it, you can use Crop tool at Photoshop CS 5. This tool very easy to use.
1. Open your file
2. Left click Crop Tool at right bar.
Crop Tool
3. Make square with Crop Tool at your photo. It will be like this.
4. Right Click at your photo and left click crop.
before
after

How to Make Photo Collage With Photoshop CS 5

Photo Collage mean combine 2 or more photo to become 1 photo. This effect commonly used in wedding photography. Before learn how to make it, better learn How to Make Arising/Shadow in Photo With Photoshop CS 5 first because it can make more attractive. If you already learn it, now we can begin.
1. Open 2 or more photos
2. Drag the Second Photo to the Primary Photo
Drag the secondary photo to primary photo

3. Click Edit at upper left corner and Choose Free Transform. Resize and place the secondary photo where ever you like
Free Transform
Secondary photo at bottom left corner
 4. Find Eraser Tool at Right Bar.

Eraser Tool
5. Set the Opacity at 10% and Size.
Set the Opacity 10% and Size

6. Wipe the secondary photo start with corner. Be careful, don't erase the object at secondary photo.
Insect Photo with Kolase Effect
 

How to Make Arising/Shadow in Photo With Photoshop CS 5

If only pictures May be it's not Quite interesting. Sometime We need to improve or edit our image. You Want To look attractive in the photo, right? One way is to create a frame or border. But the frame of how?

To create an attractive border with Photoshop CS 5 is very exciting. Your photos will appear arising / outstanding. Because the photo you would like to have a shadow.

For more details, let us begin to make it
1. Open your image That You Want to edit. You can learn at here
Butterfly

2. Adjust your Canvas Size about 10-20 pixels. If want more you can adjust 100px. Of Course Width and Height.
3. Use the Rectangular Marquee Tool and make square around the image between image and canvas.
Rectangular Marquee Tool
square it around image between image and canvas

2. Find creat new layer fill or adjustment layer. You can learn here.
3. Choose Solid Color and pick white or # ffffff
4. Set the Fill at the bottom right corner until 0%
Change Fill to 0%

5. Left click Blending Options at the bottom right corner and choose Inner Shadow. Set Angle 135 degrees. Distance : 0. Size : 1.
Choose Inner Shadow
Layer Style Inner Shadow

6. Do it once again like no.5 but choose Drop Shadow and set Opacity : 80%. Distance 7px. Size 5px.
Layer Style Drop Shadow

7. And then you can save your photo
Result Butterfly

Fastest Way To Improve Photos

learning by reading

As we know, at this time many people want to look attractive on social networking. They will show them a good photo so that makes other people will be interested. Not a few websites that offer a place to share files / photos. So that others can see the attractions around the world. Of course, with good photo quality.

On development of photos editing needed speed and interesting results. Moreover, coupled with business competition in a business such as wedding photography. It's very necessary ability photography and editing image quality for the results satisfy the customers.

To get the speed and interesting results can be used in photo editing photoshop. Not a few people who use photoshop to enhance their photos. Also even if you do not use photoshop they will never be satisfied. This is also due to lack or limitation of the camera used.

Photoshop offer a very quick step by using the feature "action". Only with once clicks you can generate a very interesting photo. This way save your time. This method is very effective and efficient. In fact you're no longer need to learn how to use Photoshop. All you do is need to find for "action" in this case download the "action". Many websites that offer "action" either pay or free. Among deviantArt.

For example download this action : http://nooreva.deviantart.com/art/Infra-Red-action-by-noor-96073591 by Muchamad Noor Eva A. This action will displays your photos are like Infra Red photo. This will make your photo more interesting.

How to incorporate action into Photoshop:
Double click the action that you've downlod. Then it will automatically opens Photoshop and will enter into the history of action.
If your file more than 1, you can do with this ways:
1. Open Photoshop
2. Click Action on the right of the picture are like Play button
Action tool

3. Select Load Actions.
choose Load Action...

4. New window will appear(Load). And then you can choose multiple files action (ATN file) simultaneously. Then click Load. Your "Action" will be logged into the "Action" history.
new window " Load "
Or you can creat your own action. You can learn at here 
 http://blog.epicedits.com/2008/03/07/how-to-create-photoshop-actions/

Tutorial : Create Black and White Background using Eraser Tool in Photoshop

learning by reading
How to create black and white background

Sometimes we want to improve our photo so appear more attractive. This time we'll make aphoto with 2 different colors. You could say we're going to make black and whitebackground / objects. While the subject is still colored with photoshop tools. Read this first to know how to open file in Photoshop.

Step:
1. Open the photo that will be edited.

new photo
 
2. click "crate new fill or adjustment layer" at the bottom right corner. Then select black and white.

choose Black and White...
 
3. Left click the selection tool, hold it and choose quick selection tool. Drag over thesubject or the part that you created will be colored.

choose Quick Selection Tool
after using Quick selection tool
 
4. Left click on the eraser, hold it and choose the erase tool. Wipe on all parts of the photo.

choose Eraser Tool
result
 

Using Blur Tool in Photoshop

learning by reading

To create a blur on the photo depending on the type of camera / lens that we use. In this case there are several things that affect. It will be discussed in the article next time.

Because of the limited camera or lens, then we'll  hard to create a blur in the background. Therefore we need a digital image editing tools for photo appearance according what we want. In this case we will use the Blur Tool in Photoshop. To open file you must read this first.

It is very easy to create a blur on the photo we will edit using the Blur Tool. Especially using Photosop. Here are the steps:
1. Open the file that you wan to edit

new photo
 
2. Left click the Selection tool and hold it until they release a new choice. Select the quick selection tool to select the image you want to blur it.

choose quick selection tool
after using quick selection tool
 
3. Left Click on the Blur tool and hold it (picture like water from dripping). Choose the blur tool.

choose blur tool
 
4. The strength of the blur tool can be changed on the top menu. The strength of the blur tool show at percentage. You can change your liking. And you can change how big the circle to blur tool

strength of blur tool
resize the blur tool
 
5. Rub crusor to the section you want blur or to all parts of the photo. If you want more blur then you change the percentage strength of the blur tool. Or you can be wiped several times.

before                                                                                               after

Editing Photo Vintage with 3 Simple Step

How do edit photo with simple step
Vintage color is the color most favored by lovers of image editing / photo. This is because the color is soft and beautiful. In fact many of them bring an action or a way to make a vintage color. But it usually means they are very difficult and very hard to follow.

This time we'll try to edit / change the color like a vintage photo by using Photoshop CS5. In addition to Photoshop CS 5 can also be done in the previous series because it used the same menu. This tips very easy to do. Because only consists of 3 easy steps. If you new comer, read this first.

1. Open the photo that you want to edit

new photo without editing

2.  a. Click on the "Create new fill or adjustment" of the screen on the bottom right corner. Then choose a solid color and a new window will appear.

Create new fill or adjustment layer
Choose Solid Color

      b.  Pick the color of your liking (dark color recommended). Your photo will be covered by the color.    Ignore it and go directly to the next step.


Pick a solid color 
  
3. Find the column under the layer (read : normal). From "normal"  change to  "exclusion". And look what happened to your photo.


Choose exclusion

4. Congratulations to experiment with your favorite colors
using dark blue
using dark red