This is default featured slide 1 title

Go to Blogger edit html and find these sentences.Now replace these sentences with your own descriptions.

This is default featured slide 2 title

Go to Blogger edit html and find these sentences.Now replace these sentences with your own descriptions.

This is default featured slide 3 title

Go to Blogger edit html and find these sentences.Now replace these sentences with your own descriptions.

This is default featured slide 4 title

Go to Blogger edit html and find these sentences.Now replace these sentences with your own descriptions.

This is default featured slide 5 title

Go to Blogger edit html and find these sentences.Now replace these sentences with your own descriptions.

Showing posts with label tutorial. Show all posts

Creating Vector Image Using Corel Draw

Vector picture is a picture which made from line and curve. Assembly from line and curve would make some an object. It's like a cartoon image. To create Vector Image not very hard. But you must diligent and hard working to make various image.

Vector Image can be made from your digital image. It's very simple as long as you know the steps. Vector Image from digital image have their own fans. It made your digital image or photo looks like a cartoon and you can put it in social network.

We'll try to explain how to make vector image from digital image using Corel Draw.

1. At the first you must know how to make Posterize effect using Corel Photo Paint. Why must be like that? Posterize effect help us to determine the line and border from one color to another. If you don't know to create Posterize please click here. Usually, we use 10 level in Posterize just like in the tutorial.

Posterize using Corel Photo Paint
 2. Open your Corel Draw. And then Open your digital image which already Posterize. Remember, in Corel Draw you can't open a JPEG image. So, at first you must create a new page. And then you must import your digital image.
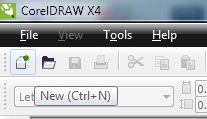
New

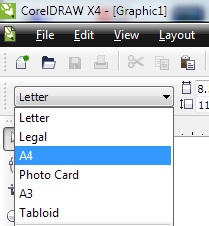
Choose Paper
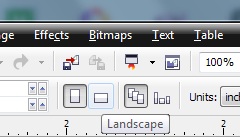
Choose Portrait or Landscape
Import your digital Image
3. Choose Pen on the left bar. And make line due the line from line on your Posterize digital image. All line on Posterize image must be lined using Pen. After that you can colored it with left click to choose color in the right bar Corel Draw
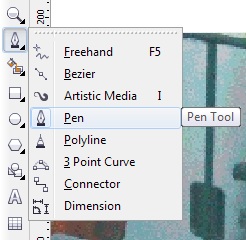
Pen
 
Make lines using Pen
4. You can create colored, black and white or another color to your vector digital image. And then you can save it.
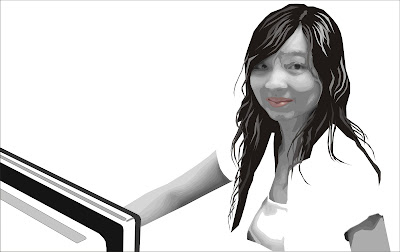
vector image in black and white
vector image in blue

Create Posterize Using Corel Photo Paint

Posterize effect actually a tool use for support to create another effect or another picture in digital image editing. For example, posterize used for creating vector picture from a digital image. Posterize make your digital image show the line between colors. So it make easily to create vector picture.

To create Posterize effect is very simple
1. Open your digital image or file
2. Left click Image and chose Transform and then left click Posterize
Image > Transform > Posterize
3. New window will open
Posterize
4. Now you can save tour digital image
before Posterize

after Posterize

Create Black and White Picture/Photo/Digital Image Using Corel Photo Paint

Black and White photo or digital image have their own fans. It's really nice to have black and white photo or digital image. It's really interesting. It have different soul from colored digital image. And we already knew that at first time digital image or photo made in black and white.

To create black and white digital image using Corel Photo Paint is very simple. And after that you can adjust the tone or another tools.
1. Open your file.
2. Left click image and choose Convert to Grayscale(8-bit)
Convert to Grayscale (8-bit)
3. Now you can save it to your computer or adjust using another tools.
before Grayscale
after Grayscale

How To Crop Photo or Digital Image Using Corel Photo Paint

Cropping is erase some element/part of your photo/digital image but your digital image still in square. Cropping can use for reduce size of digital image. Cropping in Corel Photo Paint very easy to use.
1. Open an image or photo or digital image you want to crop like this tutorial
2. Left click crop tool at the left
Crop Tool
3. Crop which part you want to save. Your picture will be like this.
Cropping
4. After that double click at the image you want to save.
Before Cropping
After Cropping

5. Then you can save the digital image like this tutorial.

How To Open Photo Using Corel Photo Paint

We already announced, that Corel have a digital image or photo editor. It's Corel Photo Paint. You can check in here.

To get Corel Photo Paint you can download it at www.corel.com. Please buy the software. Don't use an illegal progam. It's better. We are currently use Corel Photo Paint X4. If you already have another series, it's not quite different.

After doing the installation on your computer, you can open it. We will learn from the top menu or the File menu bar. Now, we try to open digital image or photo.
1. Open your Corel Photo Paint
2. Left click Open

Open an image from disk (Ctrl+O)
 3. After that, a new window will open
Open an Image

Now, you can choose photo or digital image you want to edit

Create Embos Picture With Pixlr

If you don't know about Pixlr, you can read this page first. It's like an offline digital image editor.
At this time we'll try to create an emboss effect.
1. Upload your photo at Pixlr like this tutorial
before
2. Left click Filter and choose Emboss
Emboss
3. After that, you can save on your computer or upload to social network
after using Emboss

Create Retro Vintage Effects with Pixlr

Already known that Pixlr is a online digital image editor or digital image editor which based on web. Not only editing your digital image, Pixlr offer Retro Vintage Effects too. You can enhance your digital image more attractive. It different from last our posting. It using http://pixlr.com/o-matic/. If you like your digital image look like retro or vintage, it's a best choice to use pixlr. Because it very simple. Only with one click you can change your digital image.
1. Open Pixlr and choose Retro vintage effects.
Retro vintage effects
2. Upload your digital image.
before using retro vintage effects
3. Choose what kind effects you want. At this time we choose aladin effects.
after using Retro vintage effects

Create Digital Image HDR With Pixlr

Pixlr is one of online digital image editor or digital image editor based on web. There are many tools or filter that you can use to enhance your photo to look more attractive. Using Pixlr is like you have digital image editor on your own. It's more like offline digital image editor. But remember Pixlr is an online digital image editor. So after editing your photo, you can upload to social network for easily.
For now we'll try to create HDR(High Dynamic Range) with Pixlr. It's very easy.
1. Upload your photo. Of course at Pixlr
before

2. Left click filter and choose Mimic HDR
Mimic HDR
3. After that you can save on your computer or upload to social network
after using Mimic HDR

Creat Fisheye Effect With Fotoflexer

If you already read about Fotoflexer, we guess you already know what is Fotoflexer. Fotoflexer is a online digital image editor or one of digital image editor with web based in the world of digital image editing. And hope you already to try some effect using Fotoflexer.

Fow now, we'll try to create fisheye effect use Fotoflexer.
1. Upload your file
2. Choose Distort
Distort
3. Then choose or left click Bulge
Bulge
4. After that you can set Size and Strength
set the Size and Strength
fisheye effect using Fotoflexer

Create Fisheye Effect With Photoshop CS 5 method 3(Use Liquify tools)

If you already read method 1 and method 2, you know that Photoshop CS 5 on of digital image editor have many method to create fisheye effect. And now we'll learn create it using Liquify tools. With all these 3 method tutorial, you can choose which tutorial you like.
1. Open your file
2. Left click Filter and choose Liquify
Filter > Liquify
3. New window will appear. At left choose Bloat Tool(B)
Bloat Tool(B)
4. At the right at Tool Options set Brush Size, Brush Density and Brush Rate as you like. We use Brush Size = 436, Brush Density = 60, and Brush Rate = 66. And then click our photo. Some times not only 1 click but it can 4-5 click as you like.
Tool Options
5. And then you can save it
fisheye effect using Liquify

Create Fisheye Effect With Photoshop CS 5 method 2(Use Distort tools)

From method 1, we already know how to create fisheye effect use Lens Correction. Because Photoshop CS 5 as a digital image editor have many tools, we can create fisheye effect with another tools. In these method 2 we'll learn create it using Distort.
1. Open your file
2. Left Click Filter, choose Distort, and left click Pinch
Filter > Distort > Pinch
3. New window will appear. Set Amount at -60%
Pinch
4. Click OK at the top right corner. And your photo ready to save.
create fisheye effect using Distort (Pinch tool)

Create Fisheye Effect With Photoshop CS 5 method 1(Use Lens Correction)

If you have an offline digital image editor, it's very useful to make your digital image/photo to look more attractive. And if you compare another offline digital image editor and online digital image editor, Photoshop CS 5 is one of the best offline digital image editor.

You already now what is it fisheye effect, right? And already know hot to create it with GIMP or Photoscape. Now we will create it with Photoshop CS 5 using Lens Correction tools.
1. Open your file in Photoshop CS 5
2. Left Click Filter and choose Lens Correction
Filter > Lens Correction
3. New window will appear. Choose Custom at the right. Set Remove Distortion at -40.00
Remove Distortion
4. And then click OK at the top right corner.
before use Lens Correction

after use Lens Correction

Create Fisheye Effect With GIMP

GIMP is one of famous offline digital image editor. And you can get it for free. You don't need to buy it. So many tools which you can use to create some effect. Such as Fisheye effect. Fisheye effect in GIMP can create using Distort tools. It's really easy. But always to remember. Use this tools can sacrifice some of your digital image. Because at the end you must crop it to erase some part at the corner your digital image. So better you learn Playing Distort in GIMP part 2 first before doing this tutorial.
1. Open your image
2. Choose Filter > Distort > Lens Distortion (like Playing Distort in GIMP part 2)
3. Set Main = 100. Edge = 90.308. And Zoom = 62.996
Lens Distortion
4. After that you can resize or save it
Before
result using Lens Distortion

How To Resize Digital Image/Photo Use GIMP

In the world of the internet has been introduced to social networking. Of course you already know it. such as Facebook and Twitter. Every social networking require photo/digital image as identification. And we sure some of you want to display your photo/digital image more attractive.

If you as produce photo/digital image in larger size then you will find it hard to upload. This situation can be tricked to resize photos on a digital image editor. As in the offline digital image editor GIMP. Do you already know how? Here are the ways
1. Open your photo
2. Left click Image at the top and choose Scale Image
Image > Scale Image
3. New window will appear. Set the With and Height as you need.
Scale Image
4. Now you can save it